Create a folder named like k8s-project-name (stands for Kubernetes) in a directory of your choice. I will create it with Laragon www folders in C:\laragon\www\k8s-node-express. Now lets init node.js app using npm init -y.
Now lets install our app basic packages – npm install express. Because we use docker containers we to run our app we do not need node_modules folder. Lest remove this folder now.
Application files
At this moment, your application should to have the fallowing files included in k8s-node-express directory.
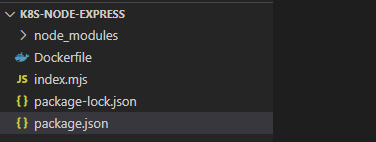
Now let’s have a quick look at each of the above file contents
index.mjs
import express from "express"
import os from 'os'

const app = express()
const PORT = 3000

// paths
const HOME = "/"

app.get(HOME, (req, res) => {
    const helloMessage = `Hellow from the ${os.hostname()}`
    console.log(helloMessage)
    res.send(helloMessage)
});

app.listen(PORT, () => {
    console.log(`Server started on port ${PORT}`)
});
package.json
{
  "name": "k8s-node-express",
  "version": "1.0.0",
  "description": "",
  "main": "index.js",
  "scripts": {
    "start": "node index.mjs",
    "test": "echo \"Error: no test specified\" && exit 1"
  },
  "keywords": [],
  "author": "",
  "license": "ISC",
  "dependencies": {
    "express": "^4.18.1"
  }
}
Notice that we have added "start": "node index.mjs", so that we can run a npm start command in our Dockerfile.
Dockerfile
FROM node:alpine

WORKDIR /app

EXPOSE 3000

COPY package.json package-lock.json ./

RUN npm install

COPY . ./

CMD ["npm", "start"]
The above app can be pulled from a GitHub repository [here]
Building docker image
TO build docker image from Dockerfile you simple run docker build command. If we want to set image tag name, we can do it with -t flag. So our command would look something like this:
// docker build . -t UNAME/IMAGENAME
docker build . -t devwl/k8s-node-express
* Remember to replace UNAME with your docker hub username. Now list all image with docker images | grep k8s

Login to dockerhub
If you did not already, create a dockerhub account now. It will be used by us to push docker image generated from Dockerfile to our external repository. Once you have created your account, you can log in docker through terminal:
docker login
Now push local docker image to repository with docker push command:
// docker push UNAME/IMAGENAME
docker push devwl/k8s-node-express
* Remember to replace UNAME with your docker hub username.


That’s all for basic app and docker setup. We are now ready to create Kubernetes deployment from our public docker image.
Kubernetes deployment
For this to work you need to install kubectl tool and run Kubernetese in cloud or at local server using minikube software. If you need a guide on this setup, see the tutorial at Getting started with Kubernetes.
Now once you all setup and ready, let’s spin some Kubernetes pods using our docker hub. Start minikube server minikube start --driver=hyperv (on Windows 10).
// kubectl create deployment DEPLOYMENTNAME --image=UNAME/IMAGENAME
kubectl create deployment k8s-node-express --image=devwl/k8s-node-express
* Remember to replace CAPITAL LETTERS with your input.
Useful Kubernetes commands: kubectl get deploy, kubectl get svc, kubectl get pods
Expose service in deployment k8s-node-express
// kubectl expose deployment DEPLOYMENTNAME --port=PORTNUM
kubectl expose deployment k8s-node-express --port=3000
Useful Kubernetes commands: kubectl get svc, kubectl get pods, minikube ip
Scaling deployment
// kubectl scale deployment DEPLOYMENTNAME --replicas=NUMOFREPLICAS
kubectl scale deployment k8s-node-express --replicas=4
Now get list of pods with kubectl get pods

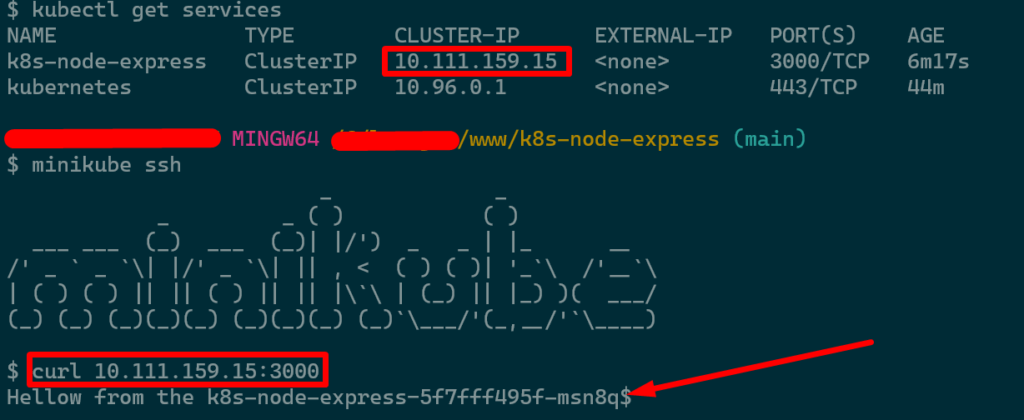
To list each pod IP address run kubectl get pods -o wide

You need to remember that, pods IP are not accessed directly with an IP. To access any of those pods we need to connect to a exposed service IP kubectl get scv. Then Kubernetes will take care of load balancing for us and will fallow request to one of the pods.
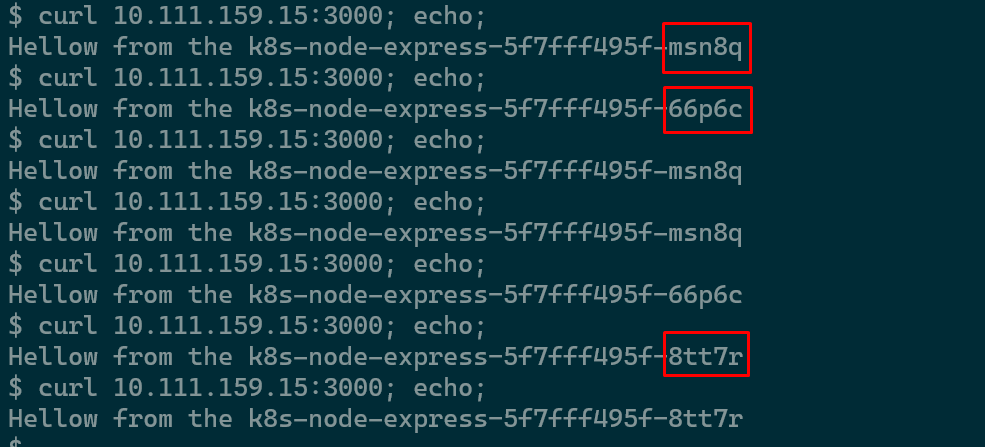
Now run from minikube (minikube ssh) run curl 10.111.159.15:3000; echo; couple of times. You will notice, that the name of the HOST (pod) return by the application are randomly changing. Which states that load balancing in Kubernetes is working correctly. See the image below:
Accusing services from outside the cluster server
Removing local service deployment
The above service was accessible only from inside the minikube cluster (server cluster). Now, let’s create a service that can be accessible also from outside the cluster.
You can remove the service with kubectl remove deployment k8s-node-express. Now lets add same service but with different port type. We will use –type=NodePort.
// kubectl expose deployment DEPLOYMENTNAME --type=NodePort --port=PORTNUM
kubectl expose deployment k8s-node-express --type=NodePort --port=3000
Now list services with kubectl get svc

On the above image, note the new highlighted (randomly generated) port, which with combination of the cluster IP address (minikub ip) will allow us to connect to this service from our host machine (laptop browser).
Open the browser on your host machine and enter IP address of your minikube fallowed by the service NodePort. In my case I could also run curl 192.168.188.61:31467 from my host machine.

Browser window:


You can also connect to a service directly from minikube with minikube service NAMOFSERVICE in my case minikube service k8s-node-express. Minikube will open the service in the default browser under minikube ip:node port (example 192.168.188.61:31467).
Read more about using YAML configuration files tu set up Kubernetes deployment.
Watch this Kubernetes video tutorial
If the above tutorial was not fully clear for you, you can watch this video tutorial on Kubernetes basics by freeCodeCamp