Create the project directory and get the most recent version of WordPress
PROJECT="somesitedomaincom"
# you can replace all occurrences of "~/Sites" with ${BASEPATH}
BASEPATH="some/path/to/dir"

# Setup site folder, replace all $PROJECT with $PROJECT
mkdir ~/Sites/$PROJECT
cd ~/Sites/$PROJECT
wget http://wordpress.org/latest.tar.gz
tar -xzvf latest.tar.gz
mv wordpress/ ~/Sites/$PROJECT
rm latest.tar.gz

# Copy starter theme
cd ~/Sites/$PROJECT
wget http://github.com/toddmotto/html5blank/archive/stable.zip
unzip stable.zip
mv html5blank-stable/ ~/Sites/$PROJECT/wp-content/themes/$PROJECT
rm stable.zip
Remember! You need to set $PROJECT variable to the name of your project – go back to the very first line of this script.
If you want to run wget command on windows machine instead of linux or mac then you also need to install WGET for Windows. See the instruction in resources section on the bottom of this post. You might also want to install gitbash or cmder
I like to create a C:/bin dir and add this path to my PATH Variable so every time I need to install some new utility i through it inside this folder so I don’t have to play with PATH variable every time.
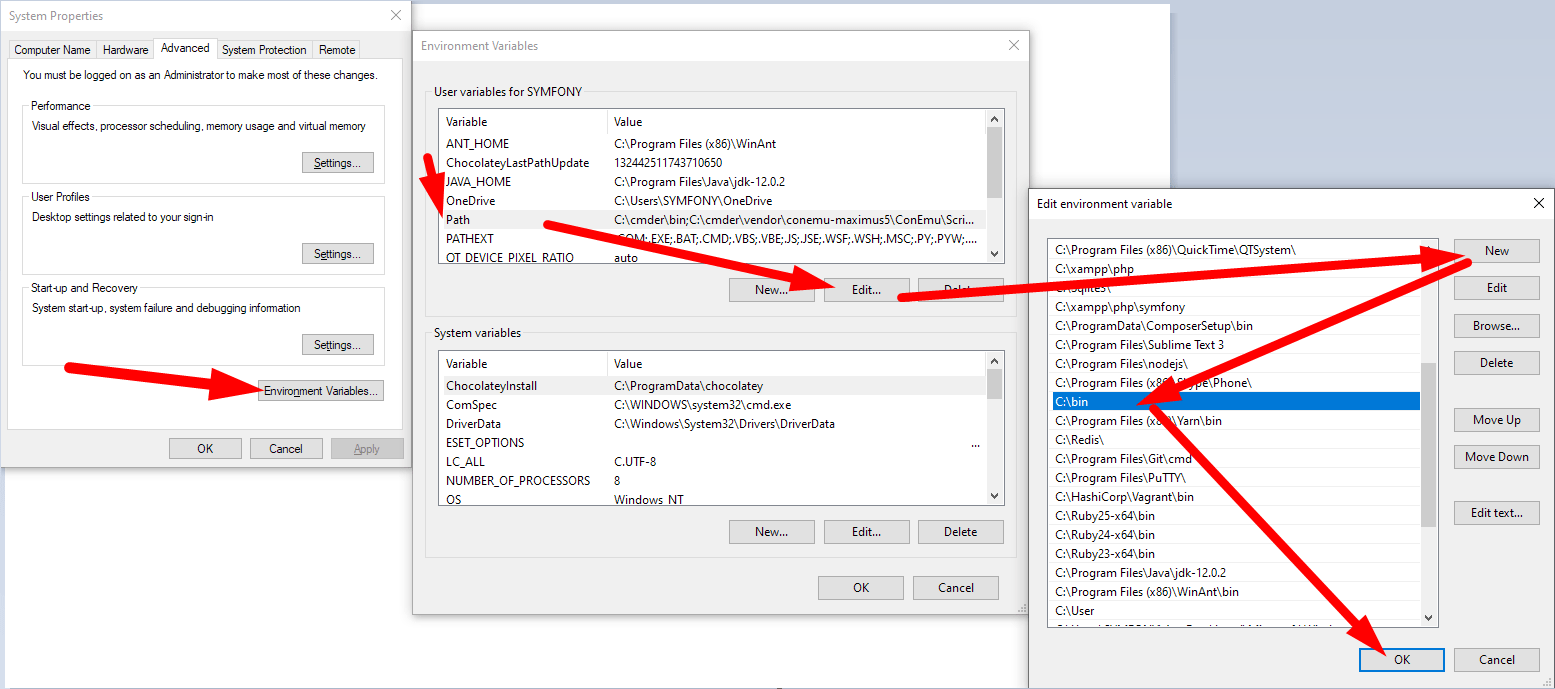
WGET downloaded and placed in C:/bin dir – now restart your terminal and you are ready to go:

Database setup
This might look different based on what access you have to your server. To create database manually your user need to have granted access. Not all hosting providers on share hosting will grant you with such a power. If you have VPS or dedicated server there will be no problem with accessing server user with all needed privileges. If you run this locally you have all you need.
We strongly recommend to use Laragon for local dev setup (this is far the most quick and easy env to work with)
# Setup MySQL Database
mysql.server start
mysql -u root -e "create database $PROJECT";
mysql -u root -e "create user '$PROJECT'@'localhost' identified by password ''";
mysql -u root -e "GRANT ALL PRIVILEGES ON $PROJECT.* TO ${PROJECT}@localhost";
mysql -u root -e "FLUSH PRIVILEGES";
Use WP_CLI for WP setup
WP CLI is a very powerful and useful utility that helps you go around with WordPress in very efficient way. Install WP-CLI from here see also a github repo. If you want to read more about quick wp-cli installation on windows read this.
# Create config file
cd ~/Sites/$PROJECT
wp core config — dbname=$PROJECT — dbuser=$PROJECT
wp core install — url=http://$PROJECT.test — title=$PROJECT — admin_user=admin — admin_password=admin123a — admin_email=someemail@gmail.com
Remove unwanted themes and download and activate plugins
After setting up WP new wp installation it is time to remove unwanted files and download and activate all necessary plugins and themes.
# Install and activate theme and plugins
wp theme activate $PROJECT
rm -rf ~/Sites/$PROJECT/wp-content/themes/twentyfourteen
rm -rf ~/Sites/$PROJECT/wp-content/themes/twentyfifteen
rm -rf ~/Sites/$PROJECT/wp-content/themes/twentysixteen
rm -rf ~/Sites/$PROJECT/wp-content/plugins/akismet
rm ~/Sites/$PROJECT/wp-content/plugins/hello.php
mkdir ~/Sites/$PROJECT/wp-content/plugins/advanced-custom-fields-pro

# wget ACF plugin
mkdir -p ~/wordpress-plugins/advanced-custom-fields
cd ~/wordpress-plugins/advanced-custom-fields
wget https://downloads.wordpress.org/plugin/advanced-custom-fields.5.10.2.zip
# wget other plugins

cd ~/Sites/$PROJECT
cp -r ~/wordpress-plugins/advanced-custom-fields/* ~/Sites/$PROJECT/wp-content/plugins/advanced-custom-fields
wp plugin activate advanced-custom-fields
See also the fallowing links for references:
Original src – https://medium.com/@beBrllnt/from-30-minutes-to-10-seconds-automating-wordpress-setup-5ff7526942c0
Setting up shell variable – https://www.shellscript.sh/variables1.html
Install WGET on Windows 10 – https://builtvisible.com/download-your-website-with-wget/
Download latest WGET from – https://eternallybored.org/misc/wget/